
This article has been archived, as it was published several years ago, so some of its information might now be outdated. For more recent articles, please visit the main article feed.
Rendering textured views with SwiftUI
Discover page available: SwiftUIWhile highly textured, skeuomorphic interfaces might not be as popular as they once used to be, there are still situations in which we might want to use a custom image as a background within one of our views — especially when building certain kinds of apps, such as games.
This week, let’s take a look at how to do that using SwiftUI, and a few techniques that can let us overcome some of the challenges that often come with building scalable, dynamic views using static image assets.

Swift by Sundell is brought to you by the Genius Scan SDK — Add a powerful document scanner to any mobile app, and turn scans into high-quality PDFs with one line of code. Try it today.
Static images, dynamic views
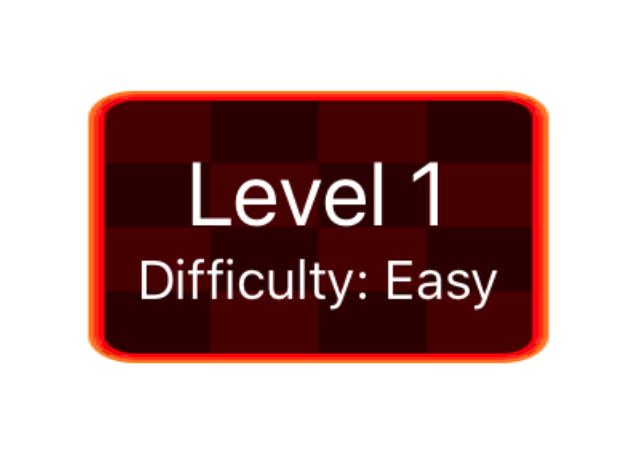
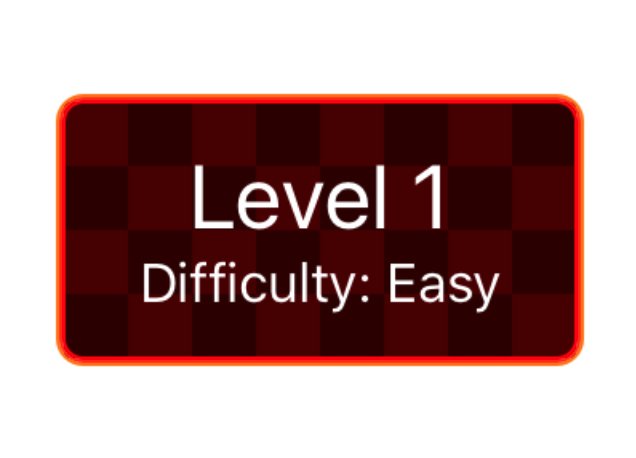
As an example, let’s say that we wanted to render a view that displays some brief information about a level within a game, such as its title and difficulty level, and that we’d like to use a custom checkered image as that view’s background. An initial idea on how to do that might be to simply apply that background image using the background modifier — like this:
struct TexturedBox: View {
    var body: some View {
        VStack {
            Text("Level 1").font(.title)
            Text("Difficulty: Easy")
        }
        .foregroundColor(.white)
        .padding()
        .background(Image("TiledBackground").resizable())
    }
}
Tip: You can use the PREVIEW button within the above code block to see what it looks like when rendered.
While the above approach might work reasonably well for high-resolution images that we wish to shrink in order to fit a given view’s size, in this situation, we end up with a blurry, stretched-out background image — since we’re doing the opposite — we’re upscaling a smaller image to fit a larger view.
One potential way to fix that problem would be to increase the size of our background image to make it at least as large as our view. However, we’d still have to make sure that the dimensions of our view ends up perfectly matching the aspect ratio of our image, and given the sheer amount of factors that can influence the size of each text-based view — from accessibility settings to what device that our code is running on — doing so could prove to be quite challenging.
Slicing and tiling
Instead, let’s explore the concept of tiling, by repeating parts of our image when it’s being resized, rather than stretching it as a whole. If we take a closer look at the background image that we’re using, we can see that it could be divided up into nine separate parts — one for each corner and side, and then a central part that contains our repeatable checkered pattern:
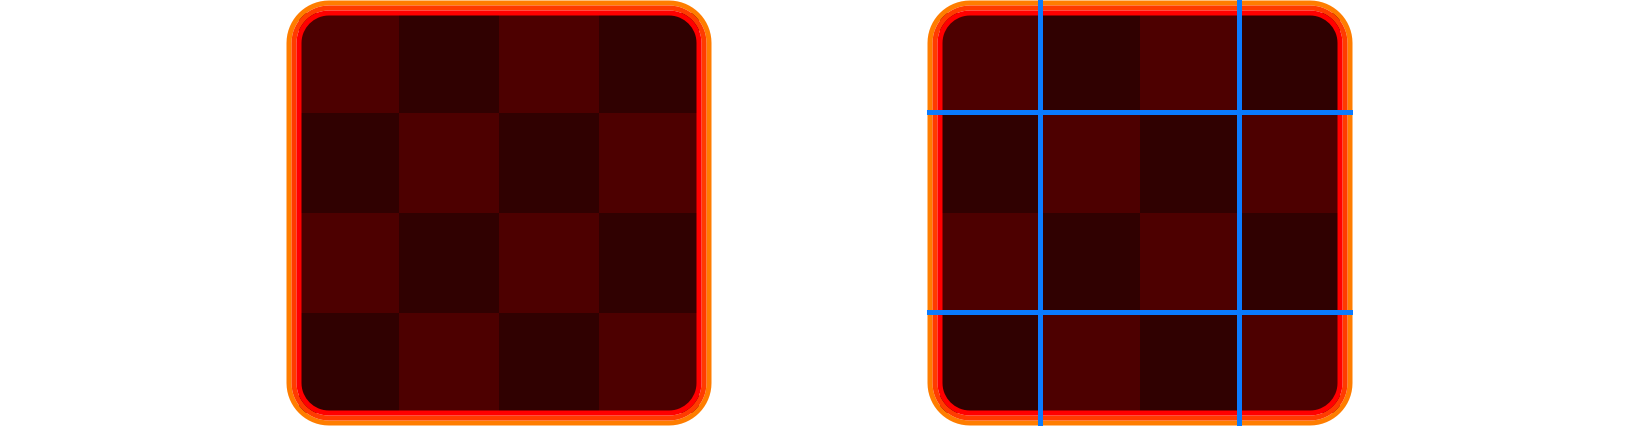
Granted, not all images will be as easily sliced as the one used above, so using tiling might require us to tweak our images to fit the above model.
To actually perform our slicing, we’re going to use SwiftUI’s EdgeInsets type to describe the points that our image should be sliced at. To make it slightly easier to do so in our case — since we want to use the same distance from each corner, given that our image is symmetrical — let’s start by introducing a convenience API that’ll let us quickly create an EdgeInsets value with a single metric:
extension EdgeInsets {
    init(all metric: CGFloat) {
        self.init(
            top: metric,
            leading: metric,
            bottom: metric,
            trailing: metric
        )
    }
}
Using the above, let’s now tell SwiftUI to slice our image at 23 points from each edge (which is the width and height of each corner within the image that we’re using), which can be done using the resizable modifier:
struct TexturedBox: View {
var body: some View {
...
.background(
Image("TiledBackground").resizable(
capInsets: EdgeInsets(all: 23)
)
)
}
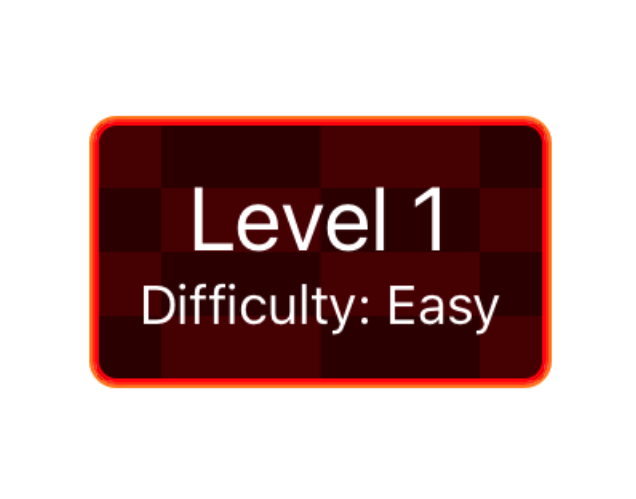
}However, while our image certainly looks much better now than it did before, the center part ends up being stretched, rather than tiled (again, feel free to use the above PREVIEW button to see what that looks like). Thankfully, that’s easily fixed by also telling SwiftUI to use the tile mode when resizing our image, like this:
struct TexturedBox: View {
var body: some View {
...
.background(
Image("TiledBackground").resizable(
capInsets: EdgeInsets(all: 23),
resizingMode: .tile
)
)
}
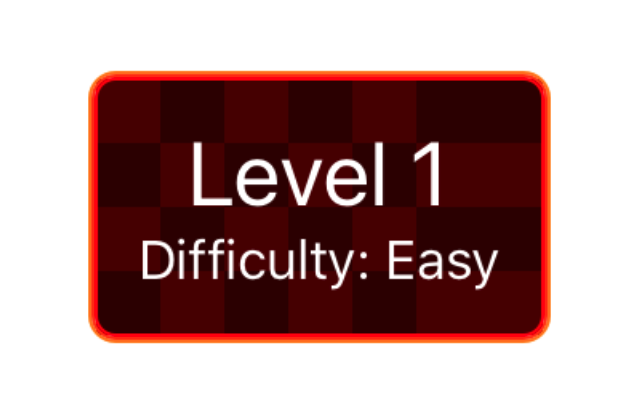
}Our background is still not perfect, though, because it turns out that our image’s central part can’t be evenly divided across the width of our view, which results in a broken tile at the trailing edge. To fix that, we’re going to have to dive a bit deeper into SwiftUI’s layout system in order to adjust the dimensions of our view itself.
Adjusted view dimensions
By default, a SwiftUI background gets its size from the view that it’s being rendered in, and doesn’t influence the size of that host view in any way. However, like we took a look at in part two of “A guide to the SwiftUI layout system”, there is a way to make a parent adjust its size according to a child view — by using SwiftUI’s preferences system.
In this case, we’d like to make our parent view aware of the size of the background image that’s being tiled, so that we can adjust our view’s size to perfectly match that tiling. To make that happen, let’s start by introducing a PreferenceKey and a View extension that together will enable us to sync the size of a given view into a Binding containing an optional CGSize value:
private struct SizePreferenceKey: PreferenceKey {
    static let defaultValue = CGSize.zero

    static func reduce(value: inout CGSize,
                       nextValue: () -> CGSize) {
        value = nextValue()
    }
}

extension View {
    func syncingSize(to binding: Binding<CGSize?>) -> some View {
        background(GeometryReader { proxy in
            Color.clear.preference(
                key: SizePreferenceKey.self,
                value: proxy.size
            )
        })
        .onPreferenceChange(SizePreferenceKey.self) {
            binding.wrappedValue = $0
        }
    }
}
If you’d like to learn more about the above approach, check out the aforementioned article “A guide to the SwiftUI layout system - Part 2”.
Next, rather than building our improved tiling implementation within our TexturedBox view itself, let’s create a reusable view modifier that’ll let us apply a perfectly tiling background to any view.
To do that, we’ll use our new size-syncing extension to capture the size of both our image and our view, and we’ll then use the frame modifier to adjust the size of the view that our modifier is being applied to — like this:
struct TilingModifier: ViewModifier {
    var image: Image
    var capInsets: EdgeInsets

    @State private var imageSize: CGSize?
    @State private var viewSize: CGSize?

    func body(content: Content) -> some View {
        // Adjusting the size of our view to fit the tiling of
        // our background image:
        content.frame(
            minWidth: sizeComponent(\.width,
                insetBy: (capInsets.leading, capInsets.trailing)
            ),
            minHeight: sizeComponent(\.height,
                insetBy: (capInsets.top, capInsets.bottom)
            )
        )
        // Rendering our background, just like we did before:
        .background(image.resizable(
            capInsets: capInsets,
            resizingMode: .tile
        ))
        // Syncing our view's size, and the size of our image,
        // by rendering a hidden, non-tiled version of it within
        // our view hierarchy:
        .syncingSize(to: $viewSize)
        .background(image.hidden().syncingSize(to: $imageSize))
    }
}
Admittedly, placing a hidden version of our image within our view hierarchy just to determine its size could be considered a bit “hacky” — but it turns out to be a very accurate way to determine exactly what size that SwiftUI considers our image to be, and since our image is already loaded into memory, and won’t actually be drawn on-screen, it’s a relatively cheap way of performing the above kind of calculation in this case.
Finally, let’s write the logic for resizing our view according to the tiling of its background image. Like the above call site shows, we’re using Swift’s key paths feature, along with a tuple containing the relevant insets, in order to enable us to reuse the same calculation code for both the width and height of our view:
private extension TilingModifier {
    func sizeComponent(
        _ component: KeyPath<CGSize, CGFloat>,
        insetBy insets: (CGFloat, CGFloat)
    ) -> CGFloat? {
        // If we haven't yet captured our view and image sizes,
        // we'll simply return nil until that info is available:
        guard let viewSize = viewSize,
              let imageSize = imageSize else {
            return nil
        }

        // Computing the length of the tiling parts of both our
        // image and our view, by subtracting the insets from
        // their total lengths:
        let tiling: (CGFloat) -> CGFloat = {
            $0 - insets.0 - insets.1
        }

        let viewMetric = tiling(viewSize[keyPath: component])
        let imageMetric = tiling(imageSize[keyPath: component])

        // The final view length should be equal to the total
        // length of our tiles plus our insets:
        let tileCount =  ceil(viewMetric / imageMetric)
        return insets.0 + tileCount * imageMetric + insets.1
    }
}
Now all that remains is to actually use our new TilingModifier within the views that have tiling backgrounds. To make it really easy to do that, let’s follow the same pattern that SwiftUI itself uses for its built-in modifiers, by creating a matching View extension for it:
extension View {
    func tiledBackground(with image: Image,
                         capInsets: EdgeInsets) -> some View {
        modifier(TilingModifier(
            image: image,
            capInsets: capInsets
        ))
    }
}
With the above in place, let’s now go back to our TexturedBox view from before and make it use our new tiledBackground API. We’ll also take this opportunity to parameterize its title and text, rather than hard-coding those values, giving us the following final implementation:
struct TexturedBox: View {
    var title: String
    var text: String

    var body: some View {
        VStack {
            Text(title).font(.title)
            Text(text)
        }
        .foregroundColor(.white)
        .padding()
        .tiledBackground(
            with: Image("TiledBackground"),
            capInsets: EdgeInsets(all: 23)
        )
    }
}
Our view now has a perfectly tiling background, thanks to the fact that its dimensions are now being adjusted to fit the tiling of its background image. While it took quite a bit of extra code to get to this point, since we implemented that code as a series of general-purpose modifiers and extensions, we’ll now be able to easily reuse that functionality whenever we’re looking to render a textured background within a view.
Swift by Sundell is brought to you by the Genius Scan SDK — Add a powerful document scanner to any mobile app, and turn scans into high-quality PDFs with one line of code. Try it today.
Conclusion
The above is arguably both a demonstration of just how powerful SwiftUI is once we dive a bit deeper into its layout system, but also how its highly declarative nature can sometimes act as an obstacle when we’re looking to write UI code that’s slightly more interconnected than the average view hierarchy.
As is so often the case with SwiftUI in general, accomplishing more advanced ways of rendering and customizing a piece of UI might require us to rethink our approach to fit into SwiftUI’s overall design — which can sometimes take a while to do, but also often results in code that’s both quite easy to reuse, and that works across all of Apple’s platforms.
The concept of tiling backgrounds is of course not unique to SwiftUI, and both UIKit and AppKit also support image slicing and tiling as well. For example, UIImage has a resizableImage(withCapInsets:) API that’s very similar to the SwiftUI modifier we used above, and NSImage has properties for both capInsets and resizingMode.
What do you think? Is texturing and image tiling something that you’ve used in apps before, and do you think that any of the techniques mentioned within this article might be useful to you and the products you work on? Let me know, along with any questions, comments or feedback that you might have, either via Twitter or email.
Thanks for reading! 🚀