
This article has been archived, as it was published several years ago, so some of its information might now be outdated. For more recent articles, please visit the main article feed.
Importing interactive UIKit views into SwiftUI
Discover page available: SwiftUISwiftUI’s UIViewRepresentable protocol makes it possible for us third party developers to bring any UIKit-based view, either one provided by Apple or one that we’ve written ourselves, into a SwiftUI view hierarchy.
While importing a static, non-interactive view is typically quite straightforward, whenever we’re dealing with some kind of interactive control that relies on UIKit-style conventions (such as either the target/action or delegate pattern), performing the necessary bridging to SwiftUI’s state management system might initially seem rather difficult.
As an example, let’s say that we wanted to use UITextView to add a larger user-editable text area within an app, rather than using SwiftUI’s built-in TextEditor view that was introduced in iOS 14 and macOS Big Sur (since that view is still quite limited in terms of functionality).
To get started, we might write the following implementation, which wraps a UITextView instance in a UIViewRepresentable-conforming struct:
struct TextView: UIViewRepresentable {
    @Binding var text: String

    func makeUIView(context: Context) -> UITextView {
        let view = UITextView()
        view.font = .preferredFont(forTextStyle: .body)
        return view
    }

    func updateUIView(_ view: UITextView, context: Context) {
        view.text = text
    }
}
However, while the above is a great starting point, we’re currently not capturing any edits that the user will make to the above text, since we haven’t connected its Binding to the text view itself.
Since a UITextView instance uses the delegate pattern to let us observe its current text, and since only reference types (specifically, NSObject subclasses) can conform to UITextViewDelegate, we won’t be able to perform that kind of observation within our TextView struct itself. But thankfully, SwiftUI provides a built-in mechanism that’s perfect for this type of situation.
Any UIViewRepresentable or UIViewControllerRepresentable type can declare a nested Coordinator type which can be used to, well, coordinate its underlying UIView or UIViewController. In our case, we can use such a type as our text view’s delegate, and then make it sync any updates to an injected Binding — like this:
extension TextView {
    class Coordinator: NSObject, UITextViewDelegate {
        @Binding private var text: String

        init(text: Binding<String>) {
            // Here we assign our injected Binding directly
            // to our text property, rather than assigning
            // its wrapped value:
            _text = text
        }

        func textViewDidChange(_ textView: UITextView) {
            text = textView.text
        }
    }
}
With the above in place, let’s now go back to our TextView struct and add the (now required) makeCoordinator method to it, and we’ll also assign the current coordinator instance as our text field’s delegate within our makeUIView method:
struct TextView: UIViewRepresentable {
    @Binding var text: String

    func makeCoordinator() -> Coordinator {
        Coordinator(text: $text)
    }

    func makeUIView(context: Context) -> UITextView {
        let view = UITextView()
        view.font = .preferredFont(forTextStyle: .body)
        view.delegate = context.coordinator
        return view
    }

    func updateUIView(_ view: UITextView, context: Context) {
        view.text = text
    }
}
That’s it! We’ll now be able to use our new TextView type within any SwiftUI view, and we can also apply standard modifiers like border and padding to it as well:
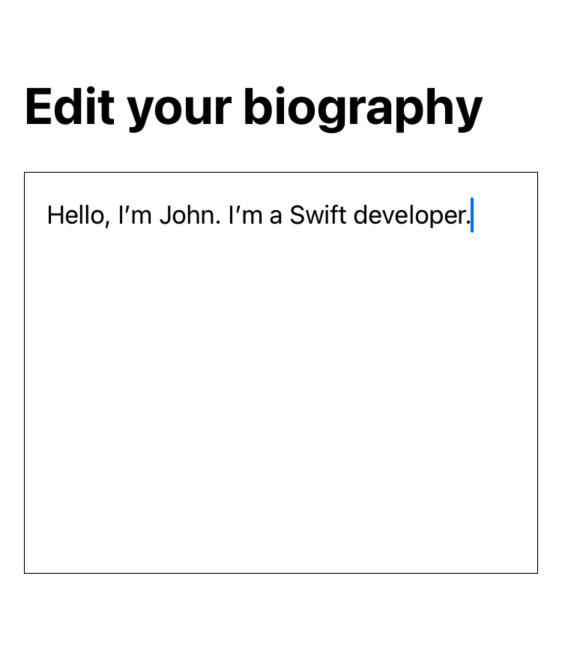
struct BiographyEditView: View {
    @Binding var biography: String

    var body: some View {
        TextView(text: $biography)
            .padding(10)
            .border(Color.primary, width: 0.5)
            .padding()
            .navigationTitle("Edit your biography")
    }
}
💡 Tip: You can use the PREVIEW button within the above code sample to see what it looks like when rendered within a NavigationView.
The fact that we can keep reusing our UIView-based components when starting to adopt SwiftUI within an existing project is incredibly convenient, and the fact that we can at any point jump back into UIKit also acts as a neat “escape hatch” for when SwiftUI can’t yet accomplish a given task.

Swift by Sundell is brought to you by the Genius Scan SDK — Add a powerful document scanner to any mobile app, and turn scans into high-quality PDFs with one line of code. Try it today.