
This article has been archived, as it was published several years ago, so some of its information might now be outdated. For more recent articles, please visit the main article feed.
Getting started with Xcode UI testing in Swift
UI testing is a great way to ensure that your most critical UI interactions keep working as you’re adding new features or refactoring your app’s codebase. It’s also a nice way to automate repetitive tasks when working on UI code (when you have to navigate deep into your app in order to test something you’re working on, for example).
Writing and running UI tests is kind of different from doing unit testing, as you are actually interacting with your app, rather than performing programmatic tests against a certain API. Both have a lot of value, and the best approach is to use both for different tasks.
Xcode ships with UI testing built into the XCTest framework, that you have probably already used for unit testing. These UI testing features have been around for a few years, but have been dismissed by many developers as unstable, flaky and hard to use. And that used to be true, in the first few iterations of Xcode UI testing things were indeed very unstable - but things are better now - and I really think it’s worth giving it a second chance if you haven’t already 🙂

Swift by Sundell is brought to you by the Genius Scan SDK — Add a powerful document scanner to any mobile app, and turn scans into high-quality PDFs with one line of code. Try it today.
Setting things up
If your app doesn’t already have a UI testing target, all you have to do to add one is to go to File > New > Target.. in Xcode and select a “UI testing bundle”. Then edit your app’s scheme to run your UI tests when testing, by going to Product > Scheme > Edit Scheme.. in Xcode and adding your UI testing bundle under “Test”.
Let’s write a test
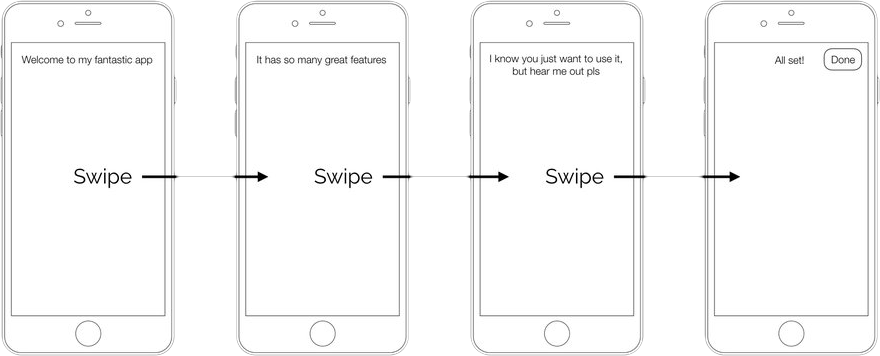
One example of where a UI test can be a great solution, is when you want to test a user flow - for example going through the onboarding flow of your app.
Let’s say your onboarding flow consists of 4 screens that the user has to swipe through in order to complete it. At the end, a “Done” button appears in the top-right corner, that needs to be tapped in order to close the onboarding flow, like this:
So, let’s write a test that does exactly that:
class OnboardingUITests: XCTestCase {
    var app: XCUIApplication!

    // MARK: - XCTestCase

    override func setUp() {
        super.setUp()

        // Since UI tests are more expensive to run, it's usually a good idea
        // to exit if a failure was encountered
        continueAfterFailure = false

        app = XCUIApplication()

        // We send a command line argument to our app,
        // to enable it to reset its state
        app.launchArguments.append("--uitesting")
    }

    // MARK: - Tests

    func testGoingThroughOnboarding() {
        app.launch()

        // Make sure we're displaying onboarding
        XCTAssertTrue(app.isDisplayingOnboarding)

        // Swipe left three times to go through the pages
        app.swipeLeft()
        app.swipeLeft()
        app.swipeLeft()

        // Tap the "Done" button
        app.buttons["Done"].tap()

        // Onboarding should no longer be displayed
        XCTAssertFalse(app.isDisplayingOnboarding)
    }
}
As you can see above, we perform our UI test by actually interacting with our UI, performing swipes and taps, rather than calling our own APIs. In fact, our tests will be running in an entirely different process, so we have zero access to our own code, which is very much by design. This “forces” us to actually test the usage of our app, rather than “faking” it.
Let’s take a closer look at two of the lines above, starting with this one:
app.launchArguments.append("--uitesting")As mentioned in the comment in the test, we do this to enable our app to be aware that it’s about to run UI tests, so that it can reset its state. This is usually a good practice, since you’ll otherwise end up with tests that will only pass under certain conditions (= flakiness).
Resetting your app’s state
So how do we actually reset our state? The easiest way to do this, is to simply check for the --uitesting command line argument when your app launches, such as in application(didFinishLaunchingWithOptions:), like this:
func application(_ application: UIApplication,
                 didFinishLaunchingWithOptions launchOptions: [UIApplicationLaunchOptionsKey : Any]?) -> Bool {
    if CommandLine.arguments.contains("--uitesting") {
        resetState()
    }

    // ...Finish setting up your app

    return true
}
Exactly what to do in resetState() will vary depending on what state your app persists. Here you want to clear out your user defaults, your database and any other things you have saved (for example files on disk). As an example, here is how to reset UserDefaults:
let defaultsName = Bundle.main.bundleIdentifier!
UserDefaults.standard.removePersistentDomain(forName: defaultsName)
Verifying state in a UI test
Going back to our test - another line that I’d like to dive in a bit deeper into is this one:
XCTAssertTrue(app.isDisplayingOnboarding)This is what we use to verify that we are in the correct state, and that our UI behaves as we expect. It’s implemented as a computed property in an extension on XCUIApplication. This is a pattern that I really recommend, as it enables you to keep your test cases short and simple, and makes it easy to reuse verification code across multiple tests.
Here’s how isDisplayingOnboarding is implemented:
extension XCUIApplication {
    var isDisplayingOnboarding: Bool {
        return otherElements["onboardingView"].exists
    }
}
The above code makes the test runner look for a UIView that has the accessibilityIdentifier “onboardingView”. All we need to do now is to add this identifier to our OnboardingViewController’s view:
final class OnboardingViewController: UIViewController {
    override func viewDidLoad() {
        super.viewDidLoad()
        view.accessibilityIdentifier = "onboardingView"
    }
}
Swift by Sundell is brought to you by the Genius Scan SDK — Add a powerful document scanner to any mobile app, and turn scans into high-quality PDFs with one line of code. Try it today.
Conclusion
In order to make your UI tests easy to maintain and fast to run, I really recommend making them as simple as possible, and leaving complex logic verification to unit tests. This kind of gives you the best “bang for the buck”, since UI tests are slower to run (since they have to actually run your app and wait for animations, etc), and also makes debugging a lot less painful.
What I love about testing in general, and this applies to UI testing as well, is that it gives me a lot higher confidence when shipping apps to users. Using the example in this post, I don’t have to constantly manually verify that onboarding works, I can just have this test running on every PR on my CI server and don’t worry about it.
As you can see in the examples above, UI testing also uses the UIKit accessibility features to navigate, meaning that if you spend some time implementing some UI tests, you can combine it with adding better accessibility to your app as well - two quick wins in one! (More on accessibility in an upcoming post).
I’ve put all of the examples above together in an example app project on GitHub, so check that out if you want to see all the details in context.
Feel free to reach out to me on Twitter if you have any questions, suggestions or feedback. I’d also love to hear from you if you have any topic that you’d like me to cover in an upcoming post! 👍
Thanks for reading! 🚀